Time
Learn to use Pryme Time by browsing documentation and walkthroughs. Includes information for users, administrators and developers.
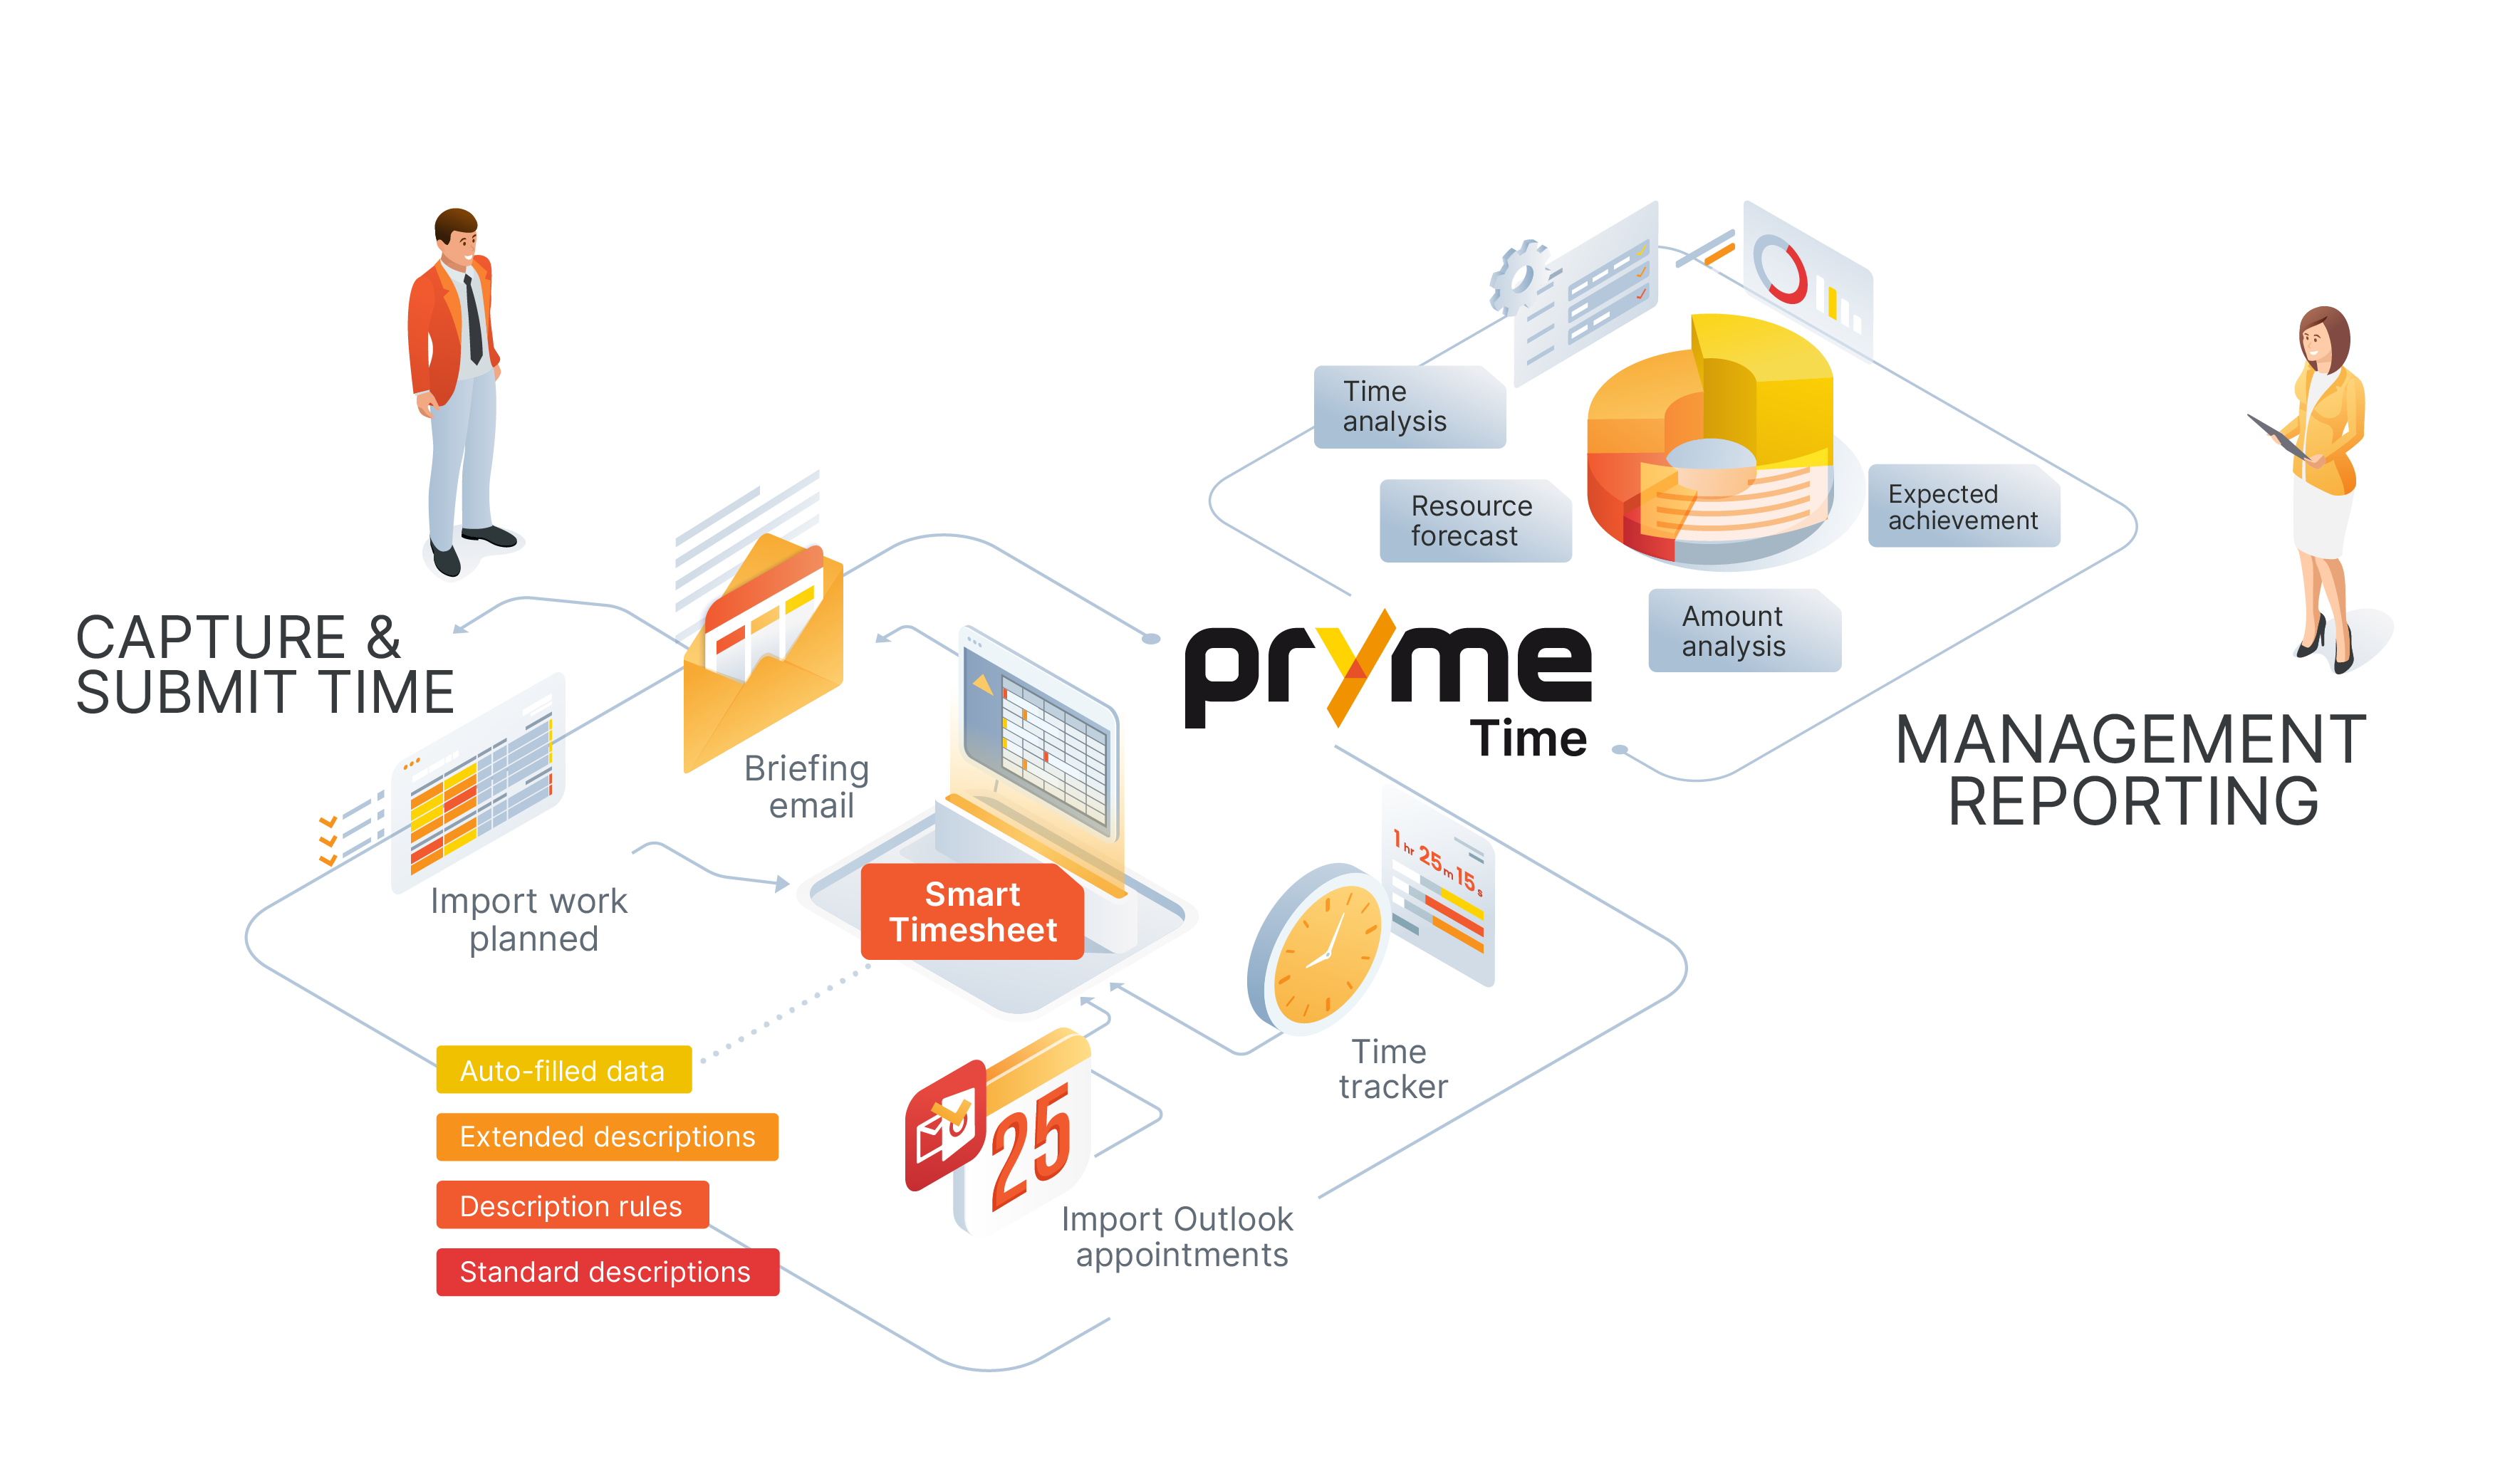
Time keeping is critical in any service-oriented business. Inaccuracies can negatively impact the bottom line because forgotten time never gets billed. However, tracking time can be challenging for individuals handling multiple tasks or several work assignments daily.
Pryme Time, is designed for project-centric businesses. There are two available Pryme Time apps. They look similar, but they’re made for different setups.
Pryme Time
This is the standard app. Use it with standard Business Central.
Pryme Time on PGS
This version is for companies that have Progressus Advanced Project installed. It works like the standard app, but there are some differences because of the extra project features.
Both apps help you track time, but make sure you pick the right one for your system.
Key Features
- Time tracking - Track multiple tasks simultaneously, down to the minute, for accurate work details.
- Calendar - Makes the tracking of time more visual and interactive.
- Email Reminders - Send reminders to resources and managers about unsubmitted and unapproved Timesheets.
- Extended description - Makes it possible to add descriptions up to 2000 characters.
- Synchronize Outlook and Teams- Create time entries from Outlook appointments and Teams calls.
YouTube channel
Watch our YouTube channel for more information about Pryme Time.
1 - Setup and configuration
Learn about setup that needs to be done before you start using Pryme Time on PGS.
1.1 - Pryme Time Setup
Learn about the setup that needs to be done before you start using Pryme Time. How to configure the time tracking calendar, create timesheet reminders for individuals and managers.
Pryme Time setup
In the Pryme Time setup you do the basic settings for Pryme Time. It’s where you enable the time tracking, set the rules for rounding of the time entries and the calendar view.
- Choose the 🔎 icon, enter Pryme Time setup, and then choose the related link.
General
Default Line type
Only available in Pryme Time
Set default Line type for the entries in the Time sheet and the Time tracking entries.
Rounding
You can configure rules using Business Central’s built-in rounding methods for managing tracked time and invoiced quantities. These advanced settings offer enhanced control and flexibility, enabling businesses to tailor time tracking and invoicing processes to their specific operational needs.
Note
If you round up the Quantity, it will increase the total worked hours for the resource. This means:
- Reported hours may be higher than the actual tracked time.
- It can impact resource utilization reports, billing, and performance metrics.
Tracking Rounding Method
The tracking rounding method is used to convert the tracked time to quantity when Create/Update entries from Time traking entries to the Timesheet. It’s suitable for billing service hours. You can set your own rule for rounding method according to your needs.
Time Entry Rounding Method
In addition to the Tracking rounding method, Time entry rounding controls how time entries are rounded in the Timesheet. This provides better control for rounding between quantity and value to invoice fields in the timesheet. These advanced settings introduce three configurable options:
Tip
To enforce a minimum quantity on e.g. 0.5 in the time sheet and always round up to the nearest 0.25, configure the rounding table as follows:
| Code | Minimum Amount | Type | Precision |
|---|
| TIMEROUND | 0 | Up | 0.5 |
| TIMEROUND | 0.5 | Up | 0.25 |
Time Rounding Rule
Determines how Time rounding in the time sheet is applied. Options include:
- None: No additional rounding is applied.
- User Confirmed: Prompts the user to confirm rounding adjustments. For example, if rounding is set to 0.1 and the user enters 0.15, the system prompts. If confirmed, the rounded value is saved. If not, saving is blocked.
- Automatic: Rounding is applied automatically without prompting the user.
Time Rounding Applies to
Only available in Pryme Time on PGS
Defines where time rounding in the time sheet is applied:
- Quantity and Value to Invoice: Rounding affects both quantity and value to invoice.
- Value to Invoice: Only the value to invoice is rounded, leaving quantity time unchanged.
Calendar view
Time scale settings
For users requiring precise adjustments, the time scale settings can help. This setting empowers to expand or decrease time periods by increments smaller or bigger than the default, allowing for meticulous control over your schedule.
- Interval setting allows you to define the time period represented between two points on the calendar, indicated by ellipses.
- Slot count determines how finely this period is sliced, creating a tailored view of your schedule.
- Increment appointments by specifies the drag and resizing time interval in minutes.
The default configuration sets the interval at 60 minutes, with a slot count of 2. This means that on the left side of the calendar, points of time are represented hour by hour, divided into intervals of 30 minutes. Adjusting these settings provides a personalized and granular perspective on your detailed time tracking entries within the calendar interface.
Tip
If you leave the interval and slot count settings empty, the system will automatically take default values of 60 minutes for the interval and 2 for slot count.Import work assignments
Only available in Pryme Time on PGS
This option allows you to include estimated hours during the import process, which automatically populates the quantity field in the timesheet.
Outlook integration
Select which Outlook integration you want to have; Graph Connection or PGS Outlook integration.
Microsoft Graph Connection
The Microsoft Graph connection is needed for synchronizing calendar appointments, emails and Teams meetings. This data is used to create time tracking entries either directly or when using the Copilot feature to complete timesheets.
Create an Entra ID app registration
Before configuring the connection to Microsoft Graph in Business Central, an Entra ID app registration must be created. The app registration is used to authenticate and authorize the connection between Business Central and Microsoft Graph, it establishes a trust relationship between your app and the Microsoft identity platform.
Only users with sufficient permissions in Entra ID can create an app registration. Regular users typically do not have the necessary permissions to create app registrations. If you are unsure about your permissions, contact your Entra ID administrator.
Follow these steps to create the app registration:
- Sign in to the Microsoft Entra admin center.
- If you have access to multiple tenants, switch to the tenant in which you want to register the application.
- Browse to Entra ID > App registrations and select New registration.
- Enter a meaningful Name for your application, for example
BC Pryme Time, it can be changed at any time. - Under Supported account types, specify who can use the application. We recommend you select Accounts in this organizational directory only.
- Select Register to complete the app registration.
- The application’s Overview page is displayed. Record the Application (client) ID, which uniquely identifies your application. You will need this ID later when configuring the connection in Business Central.
- In the left navigation pane, select Certificates & secrets.
- Under Client secrets, select New client secret.
- Enter a description for the client secret, such as
BC Pryme Time Secret, and select an expiration period that suits your needs. - Select Add to create the client secret.
- After the client secret is created, copy the Value of the client secret. This value is only displayed once, so make sure to save it securely. You will need this value later when configuring the connection in Business Central.
- In the left navigation pane, select API permissions.
- Select Add a permission.
- Select Microsoft Graph.
- Select Application permissions.
- In the search box, type
Calendars.Read, select it from the list, and then select Add permissions. - Repeat the previous step to add the following permissions:
Mail.ReadCallRecords.Read.AllUser.ReadBasic.All
- After adding the permissions, select Grant admin consent for [Your Organization] to grant the permissions to the app.
- Confirm the action when prompted.
To set up the Microsoft Graph connection in Business Central
- Choose the 🔎 icon, enter Pryme Time Setup, and then select the related link.
- In the Microsoft Graph Connection fast tab, fill in the fields as necessary:
- Client ID: Enter the Application (client) ID you recorded earlier.
- Client Secret: Enter the client secret value you copied earlier.
Note
Pryme Time can use PGS Outlook integration and Microsoft Graph Connection at the same time.
Outlook appointments may be imported through either PGS or Microsoft Graph, while Teams meetings and emails require the Graph connection.
If Graph credentials are missing, Teams and email import will prompt for connection details. Outlook appointment import remains available as long as one of the integrations is configured.
Tip
A common mistake is to copy the Client Secret ID instead of the Value. Make sure you copy the Value.
The Value is a long string of characters of random upper and lower case letters and numbers, while the Client Secret ID is only lower case letter, numbers and dashes.Copilot assistant
To enhance descriptions in the timesheet and time tracking entries, customised Copilot commands can be defined to refine the quality of the text. These commands help streamline entry descriptions by:
- Using clear and precise wording
- Ensuring grammatical accuracy
- Following a structured format
- Removing redundant or unnecessary details
Schedule reminders
Only available in Pryme Time on PGS
The process of submitting timesheets involves the routine reporting and posting of expired ones. To assist with this, you can set up reminders that will periodically send an email to resources or managers.
In Pryme Time on PGS you have the following reminder emails:
Unsubmitted timesheets to Resources
This email allows the resource to review and submit the entries in the timesheet. The resource can also open the timesheet from the email to review and adjust the timesheet. Before the email is created, the timesheet can be updated with any necessary work assignments.
Unsubmitted timesheets to Managers
This mail is a list of unsubmitted timesheet of your team members. This can help ensure that your timesheets are accurate and up-to-date and make the process of submitting them more efficient.
Unapproved timesheets to Managers
This email is sent to approvers (Project Managers, Line Managers, and Project Executives) when they have timesheets pending approval.
Here you have detailed information about setting up email reminders
These reminders can be complemented with setting up reminder emails in Progressus
1.2 - Basic setup
Learn about the basic setup that needs to be done before you start using Pryme Time. Learn about Norm time, how to create retention policies for time tracking entries, and how to give the correct permission to users.
Norm time
Only available in Pryme Time on PGS
To configure personalized working hour representations in the calendar, you can establish individual norms for each day, enabling dynamic adjustments for exceptions. By defining norm working hours and norm time expectations, users ensure accurate highlighting of their schedules, fostering effective time management. For this purpose, you have
Norm Working Hours.
You can also specify time exceptions for dates, ensuring that non-working days have their norm time values set to zero. For this purpose, you have the Norm Time Exceptions
Retention policies
To ensure optimal performance of our time tracking app, it is important to manage the storage of entries from various users. By default, the app is equipped with retention policies that automatically delete all entries older than two months.
If necessary, manual setup of retention policies can also be performed. To manually create retention policy, please follow the steps below:
Create retention policy for Time tracking entries
- Choose the 🔎 icon, enter Retention policies, and then choose the related link.
- Click on New to create.
- Specify the table to which the retention policy applies, you can either enter in the field Table id 70230200 manually or use the dropdown menu to select the table from a list Time tracking table.
- Fill in Retention period with period after which records will be deleted.
- Check fields Apply to all records and Enabled to true.
Create retention policy for Detailed time tracking entries
- Choose the 🔎 icon, enter Retention policies, and then choose the related link.
- Click on New to create.
Permissions
Pryme Time on PGS
The following permission sets are available in Pryme Time on PGS.
PRYME TIME ADM.TYME – Pryme Time Administrator
TIME TR. USER TYME – Time tracking user
TIME – READ TYME – Read only permission
Pryme Time
The following permission sets are available in Pryme Time.
PRYME TIME ADM.TYME – Pryme Time Administrator
TIME TR. USER TYME – Time tracking user
TIME – READ TYME – Read only permission
1.3 - Description features
Learn about how to configure the extended description and standard text.
Extended description
The description field for time entries is limited to 100 characters. With the Extended description you increase this limit to 2 000 characters.
Once enabled, the following features are also available:
- Standard text
- Extended description rules
To set the extended description
- Choose the 🔎 icon, enter Progressus Project setup pr Project setup (depending which app you are using), and then choose the related link.
- Under Time and expense registry/Time registry tab, check Extended description enabled.
- The Inline Mode fields controls if you want to edit the description directly in the Text Field or in a Popup window.
- Enable Show in Footer to display Extended descriptions at the bottom of the page. This works with both Text field and Popup.
- Set the number of Footer rows that should be visible.
Extended Description Rules
To enhance control over the content within extended descriptions, there are extended description rules. These rules provide options for handling prohibited content. You can choose to block the word or phrase altogether, issue a warning to the user, or require user confirmation before allowing the word or phrase.
To set the extended description rules
- Choose the 🔎 icon, enter Extended description rules, and then choose the related link.
- Fill in the fields as necessary. Hover over a field to read a short description.
Note
To ensure proper functionality, it is critical to use the same language code on both the project and the extended description rule. Please ensure that the language codes are consistent.
Standard Text
If you have texts or descriptions that you want to reuse when you are reporting time, you can use the standard text. Note that you must enable the extended description in the Progressus project setup before you start using the standard text in the time sheet. See here.
To set the standard text
- Choose the 🔎 icon, enter Standard text codes, and then choose the related link.
- Fill in the fields as necessary. Hover over a field to read a short description.
- When you are ready, click on Extended description.
- Fill in the fields as necessary. Hover over a field to read a short description.
Note
When using standard texts in multiple languages, it is important to maintain consistent language codes between the texts and the associated project for optimal compatibility.To use standard texts in the description
- Open the Timesheet or Time tracking entries page,
- Click on Description field.
- Click on three dots showed in the field.
- Choose previously set Standard text.
1.4 - Work types
Learn how to limit the work types that can be used in time entry on a project or a specific project task.
Work types allow you to define and categorize the various types of work performed on tasks. Whether it’s billable work like DESIGN, CONSULTING, and TESTING, or non-billable activities such as TRAVEL and TRAINING, work types provide a flexible framework for tracking and organizing your tasks.
In addition to their general functionality, Pryme Time offers two distinct functionalities:
Allowed Work types
In certain scenarios, you may want to restrict which work types can be used for time entry on specific tasks. For example, a task may only allow time to be logged for DESIGN and TESTING activities. This can be achieved by configuring Work Type Sets.
Work Type Sets can be assigned to projects, tasks, or project templates.
When a work type set is assigned only the work types in the set can be used for time entry on that project or task.
When a work type set is assigned to a project template, both the project and its tasks will automatically inherit the assigned work type set.
Define allowed Work types
- Choose the 🔎 icon, enter Work type sets, and then choose the related link.
- Fill in the fields as necessary. Hover over a field to read a short description.
- The Work Type Filter can be filled using the drill-down button and selecting one or more work types.
Once Work Type Sets are defined, you can assign them to tasks, projects, or project templates as needed.
Assign Allowed worktypes in Pryme Time on PGS
To multiple existing projects
- Choose the 🔎 icon, enter Work type sets, and then choose the related link.
- Select the work type set to which you want to assign, and then choose the Update existing projects… action.
- In the Filter page window, select filters to define the projects to which you want to assign the work type set, and then choose the OK button.
To a project
- Choose the 🔎 icon, enter Progressus Project list, and then choose the related link.
- Open the project.
- Choose the Allowed Work type field, and then choose the work type set that you want to assign to the project.
- If you want to assign the work type set to all existing tasks in the project, accept the prompt to update the tasks.
To a task
- Choose the 🔎 icon, enter Progressus Project list, and then choose the related link.
- Open the project and select the task in the Project Subform.
- Choose the Task card action from the Project menu in the project subform.
- In the Allowed Work type field, choose the work type set that you want to assign to the task.
To project template
- Choose the 🔎 icon, enter Project templates, and then choose the related link.
- Open the project template, and then choose the Edit action.
- In Allowed Work type, choose the work type set that you want to assign to the project template.
Assign Allowed worktypes in Pryme Time
To multiple existing projects
- Choose the 🔎 icon, enter Work type sets, and then choose the related link.
- Select the work type set to which you want to assign, and then choose the Update existing projects… action.
- In the Filter page window, select filters to define the projects to which you want to assign the work type set, and then choose the OK button.
To a project
- Choose the 🔎 icon, enter Projects, and then choose the related link.
- Open the project.
- In the Allowe Work Type field, under Time regitry, choose the work type set that you want to assign to the project.
- If you want to assign the work type set to all existing tasks in the project, accept the prompt to update the tasks.
To a task
- Choose the 🔎 icon, enter Projects, and then choose the related link.
- Open the project and select the task in the Project Subform.
- Click Edit action from the Manage menu.
- In the Allowed Work type field, choose the work type set that you want to assign to the task.
Default Work Types
In addition to restricting allowed work types, you can also specify a Default Work Type for a project or task. This work type will automatically appear in time entry for the task. For example, you may want to set TRAVEL as the default work type for a specific task.
Set the default Work type in Pryme Time on PGS
On a project
- Choose the 🔎 icon, enter Progressus Project list, and then choose the related link.
- Open the project.
- Choose the Default Work type field, and then choose the work type that you want to assign to the project.
- If you want to assign the work type set to all existing tasks in the project, accept the prompt to update the tasks.
On a task
- Choose the 🔎 icon, enter Progressus Project list, and then choose the related link.
- Open the project.
- Select the task to which you want to assign a default work type, and then choose the Task card action from the Project menu in the project subform.
- Choose the Default Work type field, and then choose the work type that you want to assign to the task.
On a project template
- Choose the 🔎 icon, enter Project templates, and then choose the related link.
- Select the project template to which you want to assign a defauly work type, and then choose the Edit action.
- Choose the Default Work type field, and then choose the work type that you want to assign to the project template.
Set the default Work type in Pryme Time
On a project
- Choose the 🔎 icon, enter Projects, and then choose the related link.
- Open the project.
- Choose the Default Work type field, and then choose the work type that you want to assign to the project.
- If you want to assign the work type set to all existing tasks in the project, accept the prompt to update the tasks.
On a task
- Choose the 🔎 icon, enter Projects, and then choose the related link.
- Open the project.
- Under Time Registry, choose the Default Work type
- If you want to assign the work type set to all existing tasks in the project, accept the prompt to update the tasks.
1.5 - Default Time entry task
Learn how to configure automatic task assignment on a project when entering or tracking time.
In some lines of business, most time entries are typically linked to a single task within each project. By configuring a this task at the project level, users can skip selecting the task for the majority of their time entries.
When a default task is set, it is automatically populated in the task field whenever the project is selected in the timesheet or time tracking entries. This not only improves efficiency but also reduces the risk of errors and saves valuable time for users.
Set default time entry task on existing project in Pryme Time on PGS
- Choose the 🔎 icon, enter Progressus Project list, and then choose the related link.
- Open the project.
- Open Project card from the action bar.
- Under Pemission section, select the Default Time entry task that you want to assign to the project.
Set default time entry task on existing project in Pryme Time
- Choose the 🔎 icon, enter Projects, and then choose the related link.
- Open the project.
- Under Time registry, select the Default Time entry task that you want to assign to the project.
To set default time entry task on a project template
Only available in Pryme Time on PGS
- Choose the 🔎 icon, enter Project templates, and then choose the related link.
- Select the project template, and then choose the Edit action.
- Choose the Default Time entry task field, and then choose the task that you want to assign to the project template.
1.6 - Timesheet reminders
Learn how to setup Timesheet reminders for resources and managers.
Only available in Pryme Time on PGS
Setup Timesheet reminders
The process of submitting timesheets involves the routine reporting and posting of expired ones. To assist with this, you can setup reminders that will periodically send an email to resources or managers.
In Pryme Time on PGS we have three reminder emails:
Unsubmitted timesheets to Resources
This email allows the resource to review and submit the entries in the timesheet. The resource can also open the timesheet from the email to review and adjust the timesheet. Before the email is created, the timesheet can be updated with any necessary work assignments.
Unsubmitted timesheets to Managers
This email is a list of unsubmitted timesheets of your team members. This can help ensure that your timesheets are accurate and up-to-date and make the process of submitting them more efficient.
Unapproved timesheets to Managers
This email is sent to approvers (Project Managers, Line Managers, and Project Executives) when they have timesheets pending approval.
It lists all resources and periods where time entries are waiting for their approval, helping to ensure that all time is reviewed and approved before invoicing.
Each approver will receive only the timesheets that match their specific approval type:
- Project Managers (PM) will receive entries marked as Waiting PM Approval.
- Line Managers (LM) will receive entries marked as Waiting LM Approval.
- Project Executives (PE) will receive entries marked as Waiting PE Approval.
This ensures that each approver is reminded only about the time entries that require their own action.
These reminders can be complemented with setting up reminder emails in Progressus (Only availabli in Pryme Time on PGS)
Watch our demo in timesheet reminders.
Basic setup for timesheet reminders
Before you get started working with your email reminders, there are a few decisions and steps that you should take to set up how the email will be sent. First, you have to set up both a recipient and a sender email account. For more information on how to do this, please see the instructions provided here.
Once these accounts are set up, the email scenario should be assigned to the sender account, and the recipient’s email address should be added to the resource. This will ensure that the emails are properly configured and delivered to the intended recipient. You also need to update the Timesheet configuration code where you set rules about the reminders.
Add email address to the resource
- Choose the 🔎 icon, enter Resources, and then choose the related link.
- Select a relevant resource.
- Under Personal data tab, check that the resource has an email address in the E-Mail field.
Update the Timesheet configuration code
- Choose the 🔎 icon, enter Timesheet configuration list, and then choose the related link.
- Select a relevant configuration.
- Under the Timesheet tab, you can define the reminder rules for both unsubmitted and unapproved timesheets.
- For Unsubmitted timesheets reminders
- Use the fields Timesheet reminder LM1 and Timesheet reminder LM2 to set how reminders will be sent to line managers:
- None – no emails will be sent to the line manager.
- Summary – a summary of resources and the periods they have not submitted will be sent.
- Individual – one email per resource and period that has not been submitted will be sent.
- For Unapproved timesheets reminders
- Enable the field Email alert on not approved.
Assign timesheet email scenario
- Choose the 🔎 icon, enter Email accounts, and then choose the related link.
- Select a relevant sender’s email address.
- Select Email scenarios action.
- Choose Assign scenarios action.
- Select Timesheet workflow scenario for reminders to resources or Timesheet reminders for Managers, for the reminders to managers.
Tip
The “Email alert on not approved” field must be enabled for each configuration where you want the unapproved timesheet reminders to be sent.
If it’s turned off, no approval reminders will be sent for resources using that configuration.Run reports on schedule
You can easily schedule email reminders to run at regular intervals. With a single click, all settings are automatically configured, with the option to review and customize the job queue as needed.
- Choose the 🔎 icon, enter Pryme Time Setup, and then choose the related link.
- Under Schedule Reminders, choose the action for the reminder you want to setup.
- The Job Queue Entry card opens where you can configure the emails by changing the Report parameters.
- Unsubmitted timesheet to Resources
- Language selects if the reminder emails should be translated to a different language, then system language.
- Update with Work assignments – enable if update of the timesheet is necessary before sending.
- Pre-end period reminder days set the number of days before the end of the current time period for sending the reminder email, including the current period.
- Resource – Leave blank to send to all resources.
- Unsubmitted timesheet to Managers
- Language selects if the reminder emails should be translated to a different language, then system language.
- Pre-end period reminder days set the number of days before the end of the current time period for sending the reminder email, including the current period.
- Unapproved timesheet to Managers
- Language selects if the reminder emails should be translated to a different language, then system language.
- Set the report recurrence and other settings per the standard instructions specified here.
- Enable the job queue.
You can also, set reminder manually, in standard Business Central. Learn more on scheduling a report to run.
Note
Only resources who have the send email alert when a timesheet is not submitted setting enabled in their timesheet configuration will receive email reminders. If this setting is not enabled, no email reminder will be sent to that resource.1.7 - Departments, Resource planning
Learn about how to classify the resources by department, for better planing of resource and project management. The department helps you to retrieve and analyze the resources belonging to a certain department.
Only available in Pryme Time on PGS
Department codes are used to classify the resources, for better planing of resource and project management. When doing Resource analysis, the department filter helps retrieve and analyze the resources belonging to a certain department.
Create departments
It is important to create the departments, for the resources to be classified.
- Choose the 🔎 icon, enter Departments, and then choose the related link.
- Specify the new department Code and related Description.
- You can create as many department codes as necessary.
Assign a Department to a Resource
To determine which department a resource belongs too, the Department code is set on Resource Card.
- Choose the 🔎 icon, enter Resources, and then choose the related link.
- Select the resource and open Resource card.
- Under General fast tab, select the Department code the resource belongs to.
2 - Time tracking
Learn how to effectively track time across pages and update timesheet.
Time can only be tracked on the current date. On all other dates the Start button will not be displayed. You can track time from:
- Timesheet
Only available in Pryme Time on PGS - Time Tracking Entries
- Role center
- In BC mobile app with start and stop timers directly from the Role Center
The time tracking entries has a feature that allows you to start tracking time without adding any information about the project or task. This feature doesn’t exist in the timesheet.
Watch our Pryme Time demo for more information.
Tip
You can keep track of multiple tasks simultaneously.Note
The timesheet is automatically updating the time tracking entries, but not vice versa. Entries tracked or changed in the time tracking entries must be synchronized/updated to the timesheet.2.1 - Role center
Learn how to track time from the Role center
Tracking time from Role center is available in Pryme Time and in the Mobile app. The Time tracking entries are automatically created and updated when you Start and Stop the tracking.
Start tracking
- Click on the Start icon in the Role center. This opens a pop-up window.
- Fill in the details.
- In Pryme Time for PGS, no fields are mandatory to start tracking time, but we recommend adding a Description.
- In Pryme Time, you must select a Time sheet line type before you can start tracking. No other fields are mandatory to, but we recommend adding a Description.
- Click on OK.
Stop tracking
- Click on the Stop icon in the Role center.
- If you have multiple timers running, you’ll get a list. Pick the one you want to stop.
- To update or change an entry, click Time Tracking Entries in the Role Center and do your changes.
If you forgot to stop the timer you can change the End time in the Time tracking entries. The timer stops automatically at midnight if it’s still running.
If you want to keep working on the same task later, go to Time Tracking Entries and click Start.
2.2 - Track time from Time tracking entries
Learn how to track time in Time tracking entries, including the option to start without specifying project or task, and transfer selected entries to timesheets for reporting and invoicing.
Tracking time
Time tracking is only possible for today’s date. On all other dates the Start button will be disabled.
In the Time tracking entries you can start tracking time without specifying a project or task, but we recommend adding a description. This feature is especially helpful when you don’t have a defined task, as it allows you to track the services you’re providing.
If you’ve been tracking your time for the purpose of reporting and invoicing, you can select the entries and transfer them to the timesheet for the corresponding period.
Watch our short demo how to track time in Pryme Time.
To start time tracking
- Click on the Time tracking entries icon in the Role center.
- Fill in the fields if it is needed.
- In Pryme Time for PGS, no fields are mandatory to start tracking time, but we recommend adding a Description.
- In Pryme Time, you must select a Time sheet line type before you can start tracking. No other fields are mandatory to, but we recommend adding a Description.
- Clicking on the Start button or manually entering Start time will start tracking.
To stop time tracking
- Click on the Time tracking entries icon in the Role center.
- Click on the Stop icon or fill End time.
- Update the entry with any modifications that may be needed.
Tip
If the tracking is not stoped the correct time, it’s always possible to add or change the End time manually.To view details of starting and stopping time
Every time the timer is stopped a detailed time tracking entry is created. This makes it possible to track actual time spent on working on the task, without all breaks in between. By clicking on the value in the tracked column list of detailed time tracking entries associated with the entry will be opened. On the detailed time tracking entries it’s possible to change the description, and the start/ending time. It is also possible to delete a line. Changes in start or ending time and deletion of a detailed entries will affect the time tracking entry accordingly.
Be aware if there is only one detailed time tracking for the time tracking entry, changing the description on one of them will update the other. If there are multiple details with the same description, and you update the time tracking entry then all detailed time tracking will be updated.
Note
The column tracked on the time tracking entries shows the total number of hours spent on a task, as recorded in the tracked column of the detailed time tracking entries. This total does not include breaks taken during the work period.Features in the Time tracking entries
Sync calendar appointments
It is possible to convert the Outlook calendar appointments into time tracking entries. The function searches for appointments that meet the specified filters on the request page. When running the action again, it will synchronize previously imported appointments that meet the specified filters. The synchronization will update the date, start and end time, while preserving the original description. When creating the time tracking entries, the app recognizes recurring appointments and pre-fills details based on previous entries in the same series.
- Click on the Time tracking entries icon in the Role center.
- Choose the Period type and Date filter at the top of the page to specify the timeframe for the import process.
- Choose the Sync Calendar appointments from Outlook action.
Watch our short demo how to sync calendar appointments in Pryme Time (starts at 2:47).
Note
Running synchronization for a date filter longer than 50 days is not supported.Import emails
- Click on the Time tracking entries icon in the Role center.
- Choose the Period type and Date filter at the top of the page to specify the timeframe for the import process.
- Choose Action -> Import sent/receive email
Import Teams Calls
- Click on the Time tracking entries icon in the Role center.
- Choose the Period type and Date filter at the top of the page to specify the timeframe for the import process.
- Choose Action -> Import Teams call
Complete time sheet with Copilot
Use Copilot to automatically complete your time sheet from Outlook Calendar events and Teams calls. Copilot analyses your calendar and meetings to suggest time entries. Review the proposals and accept the ones that match your actual work.
- Click on the Time tracking entries icon in the Role center.
- Click on the Copilot icon and select Complete time sheet
Improve descriptions with Copilot
Use Copilot to improve descriptions for your time tracking entries. Select entries and Copilot will suggest better, more detailed descriptions based on the context of your work. Review and accept the proposals you want to use.
- Click on the Time tracking entries icon in the Role center.
- Click on the Copilot icon and select Improve descriptions
You can read more about this functionaltity here.
Factbox
Time tracking totals
When looking at a period of time tracking it can be hard to see what all the entries sum up to and how that aligns with the expected working time.
The Time tracking totals factbox shows summary information about the period in view:
- Total tracked - the total time tracked for the period.
- Total tracked (rounded) - the total time tracked for the period rounded according to the rounding rules.
- Tracked on time sheet - the total time tracked for the period for entries connected to a time entry on the timesheet.
- Tracked not on time entries - the total time tracked for the period for entries not connected to a time entry on the timesheet.
- Time sheet entries - the total quantity on time entries for the period, including timesheet entries created manually.
- Norm time - the number of hours of expected work for the period.
2.3 - Track time from timesheet
Effortlessly track time directly from the timesheet, with automatic updates to Time tracking entries, and manage time tracking entries with start/stop functionality.
Only available in Pryme Time on PGS
Track time in Timesheet
It is possible to track time directly in the timesheet. When you track your time in the timesheet, the time tracking entries are automatically updated.
Watch our Pryme Time demo for more information.
To start time tracking
- Choose the 🔎 icon, enter Timesheets, and then choose the related link.
- Select a relevant timesheet.
- Choose the weekday or a date, project number and task number.
- Click on the Start icon.
Note
The timer can only be started for entries with the current date. If you select a date other than today, the start/stop button will be disabled.After starting with tracking time, you can see the details by clicking the number value in the tracked field.
To stop time tracking
- Choose the 🔎 icon, enter Timesheets, and then choose the related link.
- Select a relevant timesheet.
- Click on the Stop icon.
To manage time tracking entries from the timesheet
- Choose the 🔎 icon, enter Timesheets, and then choose the related link.
- Select a relevant timesheet.
- Choose the Time tracking action to open the Time tracking entries
Note
If you have tracked time or changed entries in the time tracking entries, you must update the timesheet. Use the function create/update time entries.
Read more about the conditions
here.
To view details of starting and stopping time
After you have stopped the timer, you can see the detailed lines that are associated with the time tracking entry. This lets you track actual time spent on working on the task, with all breaks in between. For example, at some point, you may have begun working on a task and spent 8 hours on it, during that time took a couple of breaks in between.
On the detailed time tracking entries it’ss allowed to adjust start/ending time and description.
Be aware of that the description on the Detailed time tracking entries is only for archive and if you change them, it will not affect the time tracking entry. Changes in start or ending time will affect the time tracking entry.
By clicking on the value in tracked column, you will be able to see a list of detailed Time tracking entries associated with the entry.
Note
The column tracked on the time tracking entries shows the total number of hours spent on a task, as recorded in the tracked column of the detailed time tracking entries. This total does not include breaks taken during the work period.Features in Time sheet
Import workassignments
The feature allows you to convert work assignments defined for a specific period into time entries. This function calculates the number of hours spent per day and adds them to the corresponding timesheet. This can be a useful tool for accurately tracking and reporting your work hours.
To import work assignments
Choose the 🔎 icon, enter Timesheets, and then choose the related link.
Select a relevant timesheet.
Choose the Update with Work Assignments action.
Watch our short demo how to import work assignments in Pryme Time (starts at 1:48).
Note
In resource planning setup the only work days in estimate decides how the number of hours on the time entry is calculated. This setting indicates that calculation is based on the days the resource has capacity, not all weekdays.Note
If a work assignment both starts and ends on working day, only work days in estimate will be respected. If a work assignment starts or ends on working day, non-working days will be included, no matter of the setting only work days in estimate.To import work assignments without quantity
Choose the 🔎 icon, enter Pryme Time Setup, and then choose the related link.
Under Import Work Assignments uncheck Include Hours with Import Work Assignments.
Work assignments will be imported now with an empty quantity. Nonetheless, a field on the time entry est. hours on work assignment, will be always populated when using the update with work assignments action. The field specifies the number of hours for the day on the work assignment that was the basis for the time entry.
2.4 - Time tracking calendar
Explore enhanced time tracking capabilities, including drag-and-drop functionality, resizing options, and timesheet entry management in the Tracking Calendar.
The Time tracking calendar makes time tracking visual and interactive. It allows you to manage, create, and organize tasks with drag-and-drop functionality.
The multiple boxes may represent the same time tracking entry, moving them across days individually is not possible to maintain accuracy in reflecting the corresponding time entries. Yet, you can easily drag and drop within the confines of a single day.
Watch our demo about the time tracking calendar.
About the Time tracking calendar
Outlook Integration
The Time Tracking Calendar integrates with Outlook and Teams, so you can see your appointments and calls alongside your tracked time.
You can convert the Outlook appointment or Teams calls into a Time tracking entry with only one click.
- Use the Show/Hide Outlook calendar and Show/Hide Teams Calls to show or hide the columns in the Time tracking calendar.
- Outlook appointments cannot be edited directly in the calendar. You can open the appointment in the calendar by double-clicking.
- After changes, click Refresh to load updated information.
- Once an appointment is converted into a time tracking entry, you can edit it directly in the Time tracking calendar.
- Teams calls cannot be modified from the Time tracking calendar
Normtime
Only available in Pryme Time on PGS
The working hours are highlighted in the calendar, based on individual norms.
More about setting norm times read here.
Adjust duration
Within the calendar view, you can adjust the duration of your detailed time tracking entries. Resize with ease, extending or shortening your tasks to better align with your dynamic schedule. Running entries are now clearly distinguished with a red shadow, reducing confusion during manipulation.
Time scale setting
For users requiring precise adjustments, the Time scale settings can help. This setting empowers to expand or decrease time periods by increments smaller or bigger than the default, allowing for meticulous control over your schedule.
Time Entry Indicators
In the right bottom corner you can see color indicators. Three colors are possible to have: green, yellow and white. The system uses color-coded indicators to reflect the status of time entries
- Green 🟢 indicates that a time entry is connected to the time tracking entry and all fields (Date, Project, Task, Work Type, Customer) are matched and updated
- Yellow 🟡 indicates that a time entry is connected but there are discrepancies between the fields;
- Empty 🔘 indicates that there is no time entry connected to the time tracking entry.
Create Time tracking entries
From Outlook appointments or Teams calls
- Click on the Time tracking calendar icon in the Role center.
- In the action menu click Show/Hide Outlook Calendar.
- Click the ‘plus’ icon located in the lower-right corner of the desired Outlook appointment to create a corresponding Time Tracking entry.
- Alternatively, right-click on the appointment and select Create Time Tracking from the context menu.
Watch our demo about creating time tracking entries from Outlook appointments or Teams calls.
Manually
- Click on the Time tracking calendar icon in the Role center.
- Double click on the empty cell or right-click on the empty cell and then choose option Insert from the menu.
- Fill in the details on the Time tracking card
- In Pryme Time on PGS, no fields are mandatory to start tracking time, but we recommend adding a Description.
- In Pryme Time, you must select a Time sheet line type. No other fields are mandatory to, but we recommend adding a Description.
- Click OK button.
Within the calendar interface, untracked time entries originating from the timesheet are visibly organized under the corresponding date header. These entries lack associated time tracking entries and therefore have no start and end time. Users can change this by drag-and-drop functionality to position them precisely within the desired timeframe. Upon relocation, the system seamlessly generates a time tracking entry for the specific time segment. Consequently, users can effectively commence tracking time for these entries.
Create/Update Time entries
You can create and update time entries in the timesheet directly from the calendar, just as you would in the time tracking entries page. More about it read here.
Complete Timesheet using Copilot
Copilot can help you fill gaps in your Timetracking calendar. For the period selected in the header, Copilot reviews your Outlook calendar, emails, and Teams meetings, and suggests entries to complete missing time.
Entries created by Copilot appear with a multicoloured block, making them easy to identify.
Copilot does not create all time tracking entries from scratch. It only works if you already have entries in Time Tracking Entries.
You’ll find this feature in the AI action group in the upper-left corner.
Whatch our demo about completing timesheet.
Factbox
Time tracking totals
When looking at a period of time tracking it can be hard to see what all the entries sum up to and how that aligns with the expected working time.
The Time tracking totals factbox shows summary information about the period in view:
- Total tracked - the total time tracked for the period.
- Total tracked (rounded) - the total time tracked for the period rounded according to the rounding rules.
- Tracked on time sheet - the total time tracked for the period for entries connected to a time entry on the timesheet.
- Tracked not on time sheet - the total time tracked for the period for entries not connected to a time entry on the timesheet.
- Time sheet entries - the total quantity on time entries for the period, including timesheet entries created manually.
- Norm time - the number of hours of expected work for the period.
2.5 - Working with descriptions
Learn how to improve your descriptions in the in the time tracking entries
Improve Descriptions using Copilot
Clear, detailed and professional descriptions on invoices are essential for effective client communication and minimizing misunderstandings. However, descriptions from Time tracking entries and Time entries often appear on invoices without sufficient refinement, potentially leading to confusion.
To address this, Copilot has been introduced to rewrite descriptions, making them concise, easy to understand and aligned with business standards. This ensures that the descriptions presented on invoices are both professional and meaningful, improving the overall approval and invoicing process.
In the Pryme Time setup you define specific Copilot commands to refine the text. These commands should:
- Improved Clarity: Ensures descriptions are concise and well-structured.
- Consistency: Maintains a uniform writing style across all entries.
- Professional Tone: Enhances readability and adherence to corporate communication standards.
For more details on Copilot and Business Central, visit.
Watch our demo how to improve descriptions using Copilot.
To Improve descriptions with Copilot
- Open the Time Tracking Entries, Timesheet, or Invoice Suggestion page.
- In the action menu, under the AI action group, select Improve Descriptions.
- Copilot will analyze and suggest improved descriptions
- Review the suggested descriptions and modify them if needed.
- Click Keep Changes to apply the refined descriptions
Example Use Case
A user creates a time tracking entry with a lengthy or unclear description. Before finalizing the invoice, they select improve Descriptions in Copilot. The tool generates a refined version that is clear and professional. The user reviews the suggestion and applies the changes.
Extended description
Before you start using the Extended description, which lets you add up to 2 000 characters instead of just 100, you need to enable the feature.
Once enabled, you are able to use Standard text and Extended description rules.
How it works
The Extended description works differently depending how it is configurated.
Pop up
If you turn on the Pop-up option, you’ll see an extra ellipsis (…) icon on the left of the Description field. Click the icon, and a pop-up window opens where you can write your description.
Text field
The Description field is extended, so you can write up to 2 000 characters directly in the Description field.
Show in footer
When Show in footer is enabled, the Extended description is visible at the bottom of the Time tracking entries page. This option can be used with Text field and Pop-up.
Extended Description Rules
To maintain professionalism and appropriateness, extended description rules allow the management of specific words or phrases.
In the set up you configure the rules:
- Block certain words or phrases (highlighted in red).
- Display a Warning when certain words or phrases are used (highlighted in blue).
- Require Confirmation before submitting the description (highlighted in yellow).
How it Works
When using the extended description field, words and phrases found in the extended description rules are highlighted in different colors. Note: The description field does not support highlighting.
2. When leaving the extended description, the text is checked against the extended description rules.
3. If a blocked word is detected, a pop-up window appears showing the blocked word.
4. After confirming the pop-up, a new page opens where the flagged words or phrases are highlighted in different colors.
5. Edit the blocked words and update any necessary text.
6. When leaving the page, approve and confirm any words found in the extended description rules.
Note
The Extended description rules only work if your entry has a Project. This is because the Language code comes from the project, and you have one description rule for each language.
Standard Text
In the context of time tracking, predefined descriptions refer to a set of standard text entries that users can select from a list when logging their time. This feature enhances consistency and efficiency in time entry, allowing users to quickly choose a description that accurately reflects the work performed without needing to type it out each time.
Benefits of Predefined Descriptions
- Time Efficiency: Users can select a predefined description from a list, saving time and effort.
- Consistency: Predefined descriptions ensure consistency in time entries, making it easier to track and categorize work activities.
- Accuracy: Users can choose descriptions that best reflect the work performed, reducing the risk of errors in time tracking.
How it works
- Navigate to the Description field.
- Click on the ellipsis (…) button on the right-hand side of the field.
- Select the desired Standard texts to insert it into the Description field.
- Edit the inserted text if necessary.
2.6 - Update timesheet
Manually update your timesheet with tracked or modified entries from Time tracking entries.
When you have tracked time or modified an existing entry in the time tracking entries, your timesheet is not automatically updated. To do this, use the function create/update time entries. You can do this from the timesheet or from the time tracking entries.
You can transfer entries to the timesheet under the following condition:
- The Time entry created is disabled.
- The Create/Update entry is enabled.
You can update existing entries in the timesheet under the following conditions:
- The Time entry created is enabled.
- The Create/Update entry is enabled (must be checked in manually).
- The corresponding time entry exists in the timesheet.
Note
- When deleting a Time tracking entry that is exists in the Time sheet, you will get a question if you want to delete the time entry or not. If you answer No, the entry stays, and the tracked time is set to zero.
- Quantity of tracked hours will be calculated using the rounding method specified in the Pryme Time setup. For more information, please refer to the details provided here.
Tip
Simplify the process of marking time tracking entries for create/update time entries action by using the include all action, which automatically checks the create/update entry field for all entries in the view. Conversely, by selecting the exclude all action, you can quickly clear the create/update entry for all entries in the view.To Create/Update Time entry from the calendar view
It’s possible to create and update time entries in the timesheet directly from the calendar, just as you would in the time tracking entries page.
To Create/Update Time entry for single Time tracking entry
- Choose the 🔎 icon, enter Time tracking calendar, and then choose the related link.
- Right-click on the tracking box of the Detailed Time tracking entry for which you want to create or update.
- Choose Create/Update Time Entry action from the context menu.
To Create/Update Time Entry for multiple Time tracking entries
- Choose the 🔎 icon, enter Time tracking calendar , and then choose the related link.
- Open tracking boxes of the Detailed Time tracking entries for which you want to create or update.
- Check Create Time entry option to on.
- On the action menu of Time tracking calendar, select Create/Update Time entries. It will run action for all detailed time tracking entries presented in the current view with checked option create time entry.
Tip
Detailed Time Tracking Entries that have been updated will be marked by a green dot (🟢) on the label. More about indicators read
here.
Tip
Actions include all and exclude all are available in the time tracking calendar as well as in time tracking entries.3 - Features in Pryme Time on PGS
Learn about the features in Pryme Time on PGS.
3.1 - Import Work Assignments
Describes how to import work assignments to timesheet.
Only available in Pryme Time on PGS
The feature allows you to convert work assignments defined for a specific period into time entries. This function calculates the number of hours spent per day and adds them to the corresponding timesheet.
This can be a useful tool for accurately tracking and reporting your work hours.
To import work assignments
- Choose the 🔎 icon, enter Timesheets, and then choose the related link.
- Select a relevant timesheet.
- Choose the Update with Work Assignments action.
Watch our short demo how to import work assignments in Pryme Time (starts at 1:48).
Note
In resource planning setup the only work days in estimate decides how the number of hours on the time entry is calculated. This setting indicates that calculation is based on the days the resource has capacity, not all weekdays.Note
If a work assignment both starts and ends on working day, only work days in estimate will be respected.
If a work assignment starts or ends on working day, non-working days will be included, no matter of the setting only work days in estimate.To import work assignments without quantity
- Choose the 🔎 icon, enter Pryme Time Setup, and then choose the related link.
- Under Import Work Assignments uncheck Include Hours with Import Work Assignments.
Work assignments will be imported now with an empty quantity. Nonetheless, a field on the time entry est. hours on work assignment, will be always populated when using the update with work assignments action. The field specifies the number of hours for the day on the work assignment that was the basis for the time entry.
3.2 - Update Budget from Work Assignments
Update project budgets based on work assignments, ensuring accurate financial tracking and resource management.
Only available in Pryme Time on PGS
The
Update Budget from Work Assignments feature allows you to update project budgets based on the work assignments associated with those projects.
This enables you to create forecast budgets that reflect the planned work and resources allocated to each project.
You can also use this feature to create an initial budget for a project based on the work assignments.
On the Resource Board page, you can use the Update Budget from Work Assignments action to update the budgets of the associated projects.
You can either update one of the budget versions defined on the project card (Quote, Original, ETC, EAC) or a specific named budget version. This is controlled by the Copy to Budget Version option.
If the selected budget version does not exist on the project, it will be created for you.
If the existing budget includes resource (group) related entries that cover the work assignments, use the Replace Budget option to delete all resource (group) related entries in the budget. This ensures that the budget only includes entries based on the current work assignments.
Note
The work assignments will not be re-linked to the budget entries created. If work assignments were created by importing a budget, the link to that budget version will still be there.4 - Resource Analysis
Resource Analysis in Project Management and Planning.
Only available in Pryme Time on PGS
Resource analysis is a crucial component of resource planning and project management. It involves evaluating and fine-tuning resource allocation, to maximize efficiency and ensure successful project execution.
Watch our short demo about Resource analysis in Pryme Time (starts at 4:32).
4.1 - Scheduled Resource Forecast Analysis
Insights into resource allocation, availability, and forecasted revenue through matrix-based analysis of work assignments on projects.
Only available in Pryme Time on PGS
The
Schedule Resource Forecast Analysis is a matrix based on work assignments on projects. You can choose to view estimated hours or total amount.
This tool is valuable as it allows you to gain insights into forecasted revenue, resource allocation and availability, which can help with project planning and decision-making.
It also provides a clear and organized way to visualize resource forecasts and potential constraints, enabling users to better manage their project resources.
You can filter it by various criteria, such as resource groups, line manager, skills, global dimensions, project and project status.
- Choose the 🔎 icon, enter Schedule Resource Forecast Analysis, and then choose the related link.
- Select a relevant page.
- Select the filters that align with your specific requirements or preferences.
Tip
By selecting the specific amount in the matrix, you can access a detailed breakdown of the associated work assignments that contribute to that total.4.2 - Resource Expected Achievements
Insights into resource expected achievements and templates.
Only available in Pryme Time on PGS
Resource Expected Achievements refers to the allocation and planning of work for a resource, related to project/resource managements.
It involves setting up various parameters for a resource, such as the number of hours they are expected to work, the percentage of those hours dedicated to customer-related work, the amount of time off (absence), and internal hours (work related to internal company matters).
The purpose of defining these expected achievements is to have a structured plan for how a resource’s time will be allocated and to ensure that the resource is working in alignment with the goals and objectives of the organization. By specifying these parameters and percentages, you can calculate and monitor how many hours the resource should be spending on customer-related tasks, internal activities, and their absence.
This approach helps in resource planning, workload management, and tracking progress toward specific objectives or contractual obligations. It also allows for more efficient and effective resource allocation, ensuring that resources are used optimally to meet project or organizational goals.
Expected Achievements Template
To calculate the expected achievements for resources, first it is needed to set up a template.
- Choose the 🔎 icon, enter Resource Expected Achievements, and then choose the related link.
- Create a template from Actions -> Expected Achievements Template.
- Specify the Start Date and End Date of when the template is valid to calculate resource achievements.
- Define resource management parameters in % such as Average Price, Absence %, Overtime%, Customer%, Internal %, Chargeable % ..etc.
- The above parameters will be later used to calculate Resource Expected Achievements.
Resource Expected Achievements
To view the expected achievements fo each resource, you need to create them first.
- From the Resource Expected Achievements go to Actions -> Create Resource Achievements.
- Select the Template Name,and whether you will create the achievements for a Resource/Resource Group/Resource Sub Group.
- Select the Period Type, Start Date and End Date corresponding to the period during which the expected achievements will start and end.
- Select OK and the expected achievement lines will be created.
- The hours for each of the parameters are calculated as a product of the total capacity for the selected period, and the % of each parameter from the template.
- Depending on the calculated parameters, and the Average Price, Expected Revenue is calculated for the selected period.
- You can filter on Resource, Resource Group, Resource Sub Group and Date, to retrieve the desired records.
4.3 - Resource Amount Analysis
Insights into resource efficiency, productivity and allocation.
Only available in Pryme Time on PGS
Resource Amount Analysis refers to the process of examining and evaluating how cost is allocated and utilized by various resources within an organization. It involves analyzing the cost incurred on tasks, activities, or projects by individuals to gain insights into resource efficiency, productivity, and allocation. The goal of resource amount analysis is to optimize resource utilization, improve productivity, and make data-driven decisions to better allocate resources for achieving specific goals or objectives.
Resource amount analysis fetches resource data, filtered by the criteria specified on the page. This data includes the cost incurred, associated with each resource relative to their capacity. The specific filters used for data retrieval are outlined below, and are divided into list filters and total filters.
List Filters
- Resource/Resource Group - specifies the filter on the resource/resource group, the number of the retrieved records is limited only to the specified filters. If empty, all records are retrieved.
- Agreement Group - sets a filter to retrieve only the resources belonging to a certain agreement group.
- Department - sets a filter to retrieve only the resources belonging to a certain department.
- Show Blocked - if selected, both blocked and unblocked resources will be shown
Totals filter
- Period Date Filter - specifies a filter on a certain period, within the fiscal year.
- Year-to-date Filter (YTD) - specifies the filter until a certain date, within the fiscal year.
- Agreement Group Filter - specifies the filter on agreement group on the data such as project ledger entries etc.
Resource Amount Analysis
Once the data is retrieved, you can view and drill down on the data for each resource. All the fields show the data in local currency. Some of the most important information that the amount analysis shows are:
- Resource - the resource for which all the below data are for.
- Exp. Invoice Amount Period (LCY) - shows the expected amount to be invoiced, for the specified period. Resource Expected Achievements needs to be updated first.
- Actual Invoice Amount Period (LCY) - shows the actual invoiced amount for this resource, for the specified period.
- Exp. Invoice Amount YTD (LCY) - shows the expected amount to be invoiced on customer-related projects for the YTD filter.
- Actual Invoice Amount YTD (LCY) - shows the actual amount invoiced on customer-related projects for the YTD filter.
- Actual Usage Sales Amount Period (LCY) - shows the amount to be invoiced on customer projects for the period filter.
- Actual Usage Sales Amount YTD (LCY) - shows the amount to be invoiced on customer projects for the YTD filter.
- Usage Amt. not Inv. Year Start - shows the usage amount not invoiced at the start of the year.
- Usage Amt. not Inv. Period End - shows the usage amount not invoiced at the end of the period.
- Net Change YTD (LCY) - specifies the calculated Net Change for the YTD filter.
- Average Invoiced Price Period (LCY) - the period average price invoiced, for the related resource.
- Average Invoiced Price YTD (LCY) - the YTD average price invoiced, for the related resource.
4.4 - Resource Time Analysis
Insights into resource efficiency, productivity and allocation.
Only available in Pryme Time on PGS
Resource Time Analysis refers to the process of examining and evaluating how time is allocated and utilized by various resources within an organization.
It involves analyzing the time spent on tasks, activities, or projects by individuals to gain insights into resource efficiency, productivity, and allocation.
The goal of resource time analysis is to optimize resource utilization, improve productivity, and make data-driven decisions to better allocate resources for achieving specific goals or objectives.
Resource Time Analysis fetches resource data, filtered by the criteria specified on the page. This data includes hours associated with each resource relative to their capacity.
The specific filters used for data retrieval are outlined below, and are divided into list filters and total filters.
List Filters
- Resource/Resource Group - specifies the filter on the resource/resource group, the number of the retrieved records is limited only to the specified filters. If empty, all records are retrieved.
- Agreement Group - sets a filter to retrieve only the resources belonging to a certain agreement group.
- Department - sets a filter to retrieve only the resources belonging to a certain department.
- Show Blocked - if selected, both blocked and unblocked resources will be shown
Totals filter
- Period Date Filter - specifies a filter on a certain period, within the fiscal year.
- Year-to-date Filter (YTD) - specifies the filter until a certain date, within the fiscal year.
- Agreement Group Filter - specifies the filter on agreement group on the data such as project ledger entries etc.
Resource Time Analysis
Once the data is retrieved, you can view and drill down on the data for each resource. Some of the most important information that the time analysis shows are:
- Resource - the resource for which all the below data are for.
- Exp. Customer Hours Period - shows the expected customer hours for the resource, for the specified period. Resource Expected Achievements needs to be updated first.
- Actual Customer Hours Period - shows the hours incurred from the resource, for the specified period.
- Exp. Customer Hours YTD - shows the expected time spent on customer-related projects for the YTD filter.
- Actual Customer Hours YTD - shows the actual time spent on customer-related projects for the YTD filter.
- Invoiced Customer Hours Period - shows the invoiced time on customer projects for the period filter.
- Invoiced Customer Hours YTD - shows the invoiced time on customer projects for the YTD filter.
- Exp. Internal Hours YTD - shows the YTD expected hours for internal projects.
- Actual Internal Hours YTD - shows posted time entries on internal projects for YTD filter.
- Net Change YTD - specifies the calculated Net Change for the YTD filter.
4.5 - Time Entry Pattern
Only available in Pryme Time on PGS
Time entry patterns refer to the relationship between when a time entry is captured and when the work was actually performed.
The pattern impacts profitability as time captured late is at risk of being forgotten and never invoiced.
By understanding time entry patterns, improvements can be identified to improve utilization and bottom line profitability.
The Time Entry Pattern report is designed to provide insights into the pattern for both the business as a whole and for individual teams/individuals.
To run report
- Choose 🔎 icon, enter Time entry pattern, and then choose the related link.
- Fill in the date or resource filter if it is needed.
Tip
In the Project Executive and Project Manager role centers you find the report under Resource Reports group.Time Entry Pattern chart
The comprehensive report is now integrated into the Role Centers. This feature provides detailed insights into time entry patterns for either all resources or the current resource only. The chart also includes options to view data for the current and previous periods, as well as different types of periods. Additionally, there is a direct download option to export the data in an Excel file for the selected resource.
You can find the chart in the bottom of Line Manager, Time and Expense, Project Executive and Project Manager role centers.
5 - Pryme Time on PGS Release Notes
12.1 (March 2026)
Fixes and minor adjustments
- #1019 Teams call for meeting shows as already added
- #1068 Hide Context menu for Teams calls in Time Tracking Calendar
- #1073 Unified Improve Description copilot across BC and PGS
12.0 (February 2026)
Application enhancements
Default line type in time sheet
You can now set a Default line type in Pryme Time Setup to automatically prefill new timesheet and time tracking entries. If left blank, no default is applied and users can continue selecting the type manually. Learn here.
Fixes and minor adjustments
- #884 Use Microsoft managed services for copilot
- #976 Change name on fast tab in Pryme Time setup
- #988 Description not updated by extended description on time entries
- #1006 No error message when everything is up to date
- #1028 Description missing for Teams calls
- #1035 Edited PM Entry descriptions not reflected on invoice specification
- #1039 Show/hide Outlook and Teams calls not working in calendar when selecting workweek
11.2.1 (January 2026)
Fixes and minor adjustments
- #1028 Description missing for Teams calls
11.2 (January 2026)
Fixes and minor adjustments
- #946 Source on TTEs created from Teams Calls using the calendar shows the source as appointment
- #962 Improve message when you double click on a Teams call in the Time tracking calendar
- #983 Not possible to maximize the approval page when extended description is on (Only Pryme time on PGS)
- #985 The Unapproved timesheet to managers email is showing the incorrect value (Only Pryme time on PGS)
- #986 Appointments ending at midnight
- #1004 Missing re-use of project/task/work type on recurring appointments
- #1008 Error on re-importing cross-midnight appointments
- #1009 Special chars in appointments are garbled
11.1 (December 2025)
Application enhancements
Set pre-end period reminder days for resource reminder job queue
Added support for configurable pre-end period reminders for resource notifications, allowing reminders to be sent before the period closes, including the current week. Learn here.
Fixes and minor adjustments
- #807 Teaching tips
- #846 Creating time tracking entries from Outlook calendar takes a very long time
- #854 Unhelpful message when Graph connection is not set up
- #914 Deselecting timesheet suggestions not applied
- #915 Description on imported received/sent emails is cut off
- #929 Graph Connector doesn’t reinitialize after updating invalid credentials in pryme time setup
- #940 Align job queue names with (Only Pryme time on PGS)
- #943 E mail reminder - the table in the email is not translated (Only Pryme time on PGS)
- #944 Unapproved timesheets to managers - language (Only Pryme time on PGS)
- #959 Read-only permission set
- #961 Texts with emojies is not displayed correctly in the time tracking calendar
- #967 Time is not rounded when updating from time tracking entries
- #969 Running time tracking entries don’t extend in calendar
- #973 Time tracking calendar isn’t reflecting the norm working hours (Only Pryme time on PGS)
- #978 Clarification and documentation update for Outlook Integration behavior (PGS vs GraphConnection)
11.0 (November 2025)
Application enhancements
Time approval reminder
A new automated reminder has been added to support timely approval of submitted time entries. When hours are still awaiting approval, the responsible Project Manager, Line Manager, or Project Executive will receive an email listing all timesheets with pending entries. The reminders can be scheduled to run on a recurring basis, helping approvers stay on top of outstanding items and reducing delays in the invoicing process.
Resource analysis reports are now easier to find and access. Reports - Resource Expected Achievements, Resource Amount Analysis, and Resource Time Analysis are added to the Resource Report menu in the Line Manager, Project Executive, and Project Manager PGS role centers. This ensures users no longer need to search for these views and can reach them directly from their role center. These reports remain hidden for the PGS T&E User role center, as intended.
Fixes and minor adjustments
- #739 Time sheet currency code should be picked from the task card (Only Pryme time on PGS)
- #775 Change the information on trackings entries in the calendar from quantity to tracked
- #847 Tooltips obscure context menu in the calendar
- #913 Half empty timesheet reminder to managers (Only Pryme time on PGS)
- #918 Entering time from mobile leaves some fields empty (Only Pryme time on PGS)
10.2.3 (November 2025)
Fixes and minor adjustments
- #939 Symbols are not displayed correctly in the calendar on BC27.1 platform
10.2.2 (November 2025)
Fixes and minor adjustments
- #938 Teams calls are not shown in calendar on BC27.1 platform
10.2 (October 2025)
Fixes and minor adjustments
- #817 Time tracking calendar won’t open properly in mobile version
- #823 Tracking Rounding Method is mandatory in Pryme Time Setup
- #837 User is able to see other resource’s timesheet when accessing their timesheet via email reminder link (Only Pryme time on PGS)
- #839 Error when copying timesheet (Only Pryme time on PGS)
- #853 On upgrade Outlook Integration in Pryme Time Setup is set to blank (Only Pryme time on PGS)
- #857 Pryme Time license is required when Pryme Time on PGS is installed (Only Pryme time on PGS)
- #858 Tracking time from the timesheet shows only the first detailed entry
- #899 Filter on Customer number is not correct in the Time sheet and the TTE
5.5.6 (September 2025)
Fixes and minor adjustments
- #841 Error when opening Resource Expected Achievements(Only Pryme time on PGS)
5.5.5 (August 2025)
Fixes and minor adjustments
- #826 Calendar doesn’t work when you refresh in another language than EN
5.4 (July 2025)
Fixes and minor adjustments
- #783 Timesheet Reminder for Managers sending reminders for current week
5.3 (June 2025)
Fixes and minor adjustments
- #644 Cross-Day Appointments Trigger Errors (not all-day appointments)
- #730 No rounding of Tracked in calendar or Time Tracking Entries
- #764 Outlook appointments that span multiple days are not imported correctly (all-day appointments)
- #768 Time tracking calendar crashes when Entry No. is zero
5.2 (May 2025)
Application enhancements
Minimum quantity to invoice
The rounding method for time quantities now respects configured Minimum Amount thresholds. This ensures that small quantities (e.g. 0.1h) are rounded up to the defined minimum (e.g. 0.5h), following tiered precision logic based on quantity ranges—including support for negative values. Learn here.
Fixes and minor adjustments
- #674 Budget amount in the factbox isn’t updated on clearing work type (Only Pryme time on PGS)
- #716 Default hour bank on timesheets doesn’t work when importing from work assignments
- #742 Cannot add line in a rejected timesheet
5.1 (April 2025)
Fixes and minor adjustments
- #641 Extend Copilot custom prompt instructions to more than 500 characters
- #667 Creating a calendar booking that ends at midnight creates a negative Time Tracking Entry
- #681 Prevent scrolling Calendar to the start of the working day on every event
- #724 Time tracking calendar is not opened correctly
4.1 (March 2025)
Fixes and minor adjustments
- #618 Copilot cuts extended description
- #637 Appointments ending at midnight continues the next day
4.0 (February 2025)
Application enhancements
App Name Change
The app name has been updated from “pryme Time” to “pryme Time for PGS” to better align with the updated direction.
3.8.2 (February 2025)
Fixes and minor adjustments
- #631 Division by zero error in Project Ledger Entries
3.8 (January 2025)
Application enhancements
AI Copilot for Improving Descriptions
New AI Copilot feature to rewrite descriptions in the Timesheets, Time Tracking Entries and in the Invoice suggestion. Assistant will help in making them clear, concise, and professional. Understandable descriptions are critical as they appear on invoices, directly impacting payment processing and client communication. This feature empowers users to generate improved descriptions, ensuring better invoice clarity and timely payments. Learn here.
This is a Preview feature. This means that data can be moved outside your primary data residency, but will never be moved outside the European Union (EU).
Creating tracking in the Calendar from all day Outlook events
Create Time Tracking Entries from all-day appointments in the calendar. Previously, all-day events couldn’t be used for tracking, but with this update, you’ll be prompted to set start and end times to ensure accurate tracking. This improvement makes it easier to manage your time, even for full-day events. Learn here.
Time Rounding in the timesheets
New time rounding options are now available in the Pryme Time setup, giving you more control over how time entries are handled. You can choose whether to round times automatically, confirm changes before saving, or skip rounding entirely. This update ensures more accurate invoicing while keeping your time tracking flexible and customizable. Learn here.
Fixes and minor adjustments
- #528 Recurring all day meetings are shown one day longer in the Outlook column
- #572 Confirmation of deleting connected time entry when deleting a time tracking entry
3.6 (December 2024)
Application enhancements
Outlook Appointment Integration for Time Tracking Calendar
The time tracking calendar now includes a new column displaying Outlook appointments alongside the standard tracked entries. This feature offers better organization and planning by allowing users to view their Outlook schedules directly in the calendar interface. Appointments are not automatically imported but can be converted into time tracking entries with ease using the “+” button or right-click options. Users can also double-click to open Outlook appointments directly. This enhancement streamlines scheduling decisions and improves time tracking efficiency. Learn here.
Fixes and minor adjustments
- #537 Clear up the worktype code when changing project/task in time sheet
- #541 A single time entry is highlighted in the calendar
- #550 Replace fabrics.css to be from CDN so to stay in sync
3.5 (November 2024)
Application enhancements
Schedule Reminder Emails
Users can now easily schedule email reminders to run at regular intervals. With a single click, all settings are automatically configured, with the option to review and customize the job queue as needed. Learn here.
Fixes and minor adjustments
- #528 Show Extended description caption for Sales Invoice Subform
3.4 (October 2024)
Application enhancements
Auto-Assignment of Project Details for Recurring Appointments
This enhancement improves time tracking for recurring appointments by automatically re-using the project, task, and work type from previous entries. When creating time tracking entries from Outlook, the app now recognizes recurring appointments and pre-fills details based on previous entries in the same series. This saves time and reduces repetitive data entry for users. Learn here.
Improved Navigation in Mobile Role Center
The mobile role center now provides easier access to time tracking entries and the calendar. Users can quickly navigate from the role center, enhancing workflow efficiency when managing time and expenses. Learn here.
Fixes and minor adjustments
- #391 Calendar is showing full day off when it’s part time off
- #429 Calendar does not display correctly if no timesheet exists for the period
- #490 Update End Time for the appointment tooltip of running time tracking entries
- #494 Different behavior in pTime when a project task is marked as Completed
- #498 Show period in Time Entry Pattern part
- #500 Extended Description not shown on Sales Lines Subform
- #502 Link pages and reports to docs
- #503 Default work type in Matrix view
- #517 You can add lines in a rejected time sheet from the TTE
- #520 It’s possible to update a posted/waiting for approval time entry from TTE
- #525 Empty weekday on reporting time from Outlook
- #526 Empty Project List in Outlook integration when the user is not PM nor PE
3.3 (September 2024)
Fixes and minor adjustments
- #283 Moving Extended Description fields from companion tables to the table extensions
3.2 (August 2024)
Application enhancements
Time Entry Pattern in the Role Centers
The comprehensive report is now integrated into the Role Centers. This new feature for the current release provides detailed insights into time entry patterns for either all resources or the current resource only. The chart also includes options to view data for the current and previous periods, as well as different types of periods. Additionally, there is a direct download option to export the data in an Excel file for the selected resource. Learn more.
Update timesheet with Work Assignments without setting quantity
It can be very helpful populating the timesheet based on the work assignments from planning, but setting the quantity adds the risk of simply accepting the planned hours as fact. We added the possibility to allow using the work assignments as a starting point, but without entering the actual hours.
Fixes and minor adjustments
- #428 Unexpected prompt to delete time entry
- #457 Description update not shown when returning to the calendar
- #465 Updating with work assignments fails on non-working days
- #467 Work type data missing on task card when importing project
- #469 Task List for Time Tracking Card is empty
3.1 (July 2024)
Fixes and minor adjustments
- #380 Hide Time Tracking Entries Page action from the calendar on opening from the Time Tracking Entries Page, vice versa for Time Tracking Calendar action
- #400 Wrong size on the time tracking calendar in the mobile app version
- #429 Calendar does not display correctly if no time sheet exists for the period
- #455 Some descriptions are not shown after updating from Outlook
- #456 Time Entry Summary report always filters on current resource
- #458 Trackings in the calendar disappear after opening and close Time Tracking entries page
3.0 (June 2024)
Application enhancements
Time Entry Summary Report
We are excited to announce our new release, which includes a comprehensive report on resolving time entry management challenges in professional services businesses. This report offers detailed insights into time entry patterns and provides actionable recommendations for optimizing resource management. With advanced features such as enhanced scheduling tools, real-time productivity tracking, and automated time entry suggestions, the report helps in accurate billing and improved efficiency across various employee profiles.
Updating Create Time Entry indicator in the Calendar on new way
To reduce confusion and improve clarity, we have updated the appointment label indicators. The new system uses color-coded indicators to reflect the status of time entries: Green 🟢 indicates that a time entry is connected to the time tracking entry and all fields (Date, Project, Task, Work Type, Customer) are matched and updated; Yellow 🟡 indicates that a time entry is connected but there are discrepancies between the fields; and Empty 🔘 indicates that there is no time entry connected to the time tracking entry. This enhancement ensures a more intuitive and precise tracking of time entries.
Fixes and minor adjustments
- #402 Not possible to add project and task on an entry in Time Tracking Calendar
- #411 The Calendar initially opens at midnight
- #422 Add no. of hours to the Time Entries in the calendar header
- #423 Deleting the last/first Detailed Time Tracking Entry from Time Tracking page should update Start/End Time for Time Tracking Entry
- #430 Timesheet currency code is missing on entries created from Time Tracking
- #434 Copy work assignment to budget filters to the current project
2.8 (May 2024)
Application enhancements
Update budget with work assignments
New feature that allows you to update or replace the resource section of your budget with work assignments. You can now specify which budget version you’d like these changes to apply to. Additionally, you have the option to delete and replace all existing resource and resource group entries in your budget.
Calendar Unfinished Tracking Indicator
Time trackings which haven’t been stopped on the previous dates will be shown as ending at midnight, but also will have special graphical mark - stripes.
Fixes and minor adjustments
- #305 Permissions clean up
- #350 Choosing a blocked task in the Time Tracking Entries
- #354 Dragging and resizing the start of a running timer in the calendar stops the timer
- #360 Description on time entry cannot be changed in the invoice suggestion when WIP entries exist for the entry
- #365 New field for Time Tracking Entry state : Running/Stopped
- #378 Deleting End Time for the detailed entry in the calendar should update the Time Tracking Entry
- #381 Update Time Tracking Calendar page after opening Time Tracking Entries
- #395 Modification of the message on deleting time tracking
2.7.1 (April 2024)
Fixes and minor adjustments
- #390 Start/Stop shows in role center when time tracking is not enabled
2.7 (April 2024)
Application enhancements
Time Entries in Time Tracking Calendar
Managing time tracking gaps can be challenging, especially when uncertainties arise from entries not created through time tracking. Non-time tracking entries are now prominently displayed at the top of the calendar, offering improved visibility and ease of management. Dragging time entries into a timeslot automatically sets the duration based on the entry’s quantity, seamlessly creating connected time tracking entries for enhanced tracking and efficiency.
Timesheet reminder for managers
Managers sometimes need to know who in their team has not submitted their timesheets so that they can help to get them submitted. An email with details for those who have not submitted their timesheets on time can help with that. The summary email provides a list of team members under a specific manager who have unsubmitted timesheets by the due date.
Start/Stop in BC mobile
Managing time on the move is now simpler with our latest mobile update. Users can start and stop timers directly from their Progressus Role Centers with just a tap. Clear indicators show when timers are active, and users can easily stop multiple timers if needed. This enhancement ensures effortless time tracking wherever you are.
Time Entry Created Indicators
Improving visibility of time tracking entries entails introducing indicators at the corners of appointment boxes. A green indicator signifies that a time entry was created from the tracking entry, yellow denotes a new or modified tracking entry requiring a corresponding time entry, and gray indicates a new tracking entry.
Working hours representation in the calendar
Improving calendar accuracy involves highlighting working hours based on individual norms, rather than a fixed schedule. Days with exceptions to the norm adjust accordingly: no hours when set to zero, and regular hours otherwise.
Highlighted running time tracking in the calendar
When viewing the time tracking calendar, running entries are now clearly distinguished with a red shadow, reducing confusion during manipulation. This visual cue ensures users are aware of active entries and helps prevent accidental adjustments while tracking.
Open Time Tracking Entries from Time Tracking Calendar
The Time Tracking Entries can be opened from Time Tracking Calendar. This eliminates the need to search for the page.
Fixes and minor adjustments
- #276 Deleting time tracking prompts for deleting time entry
- #277 Resource Forecast show amount for internal projects
- #332 Forbid changing date/weekday for TE/TTE with blank End Time
- #336 Error when enter time tracking using time tracking card
- #341 Appointment colors aren’t updated when open calendar from the timesheet/tracking and switch dates
- #348 Update to latest Syncfusion control
- #357 Project No. is missing in Matrix view on a rejected time entry
- #358 You can add a line in the Matrix view on a rejected time sheet
- #376 When create tracking entry from time entry in the calendar on today’s date, the entry has Start button
- #385 Default Time entry task on project permission on task level is not working
2.6.1 (February 2024)
Fixes and minor adjustments
- #326 Dimensions are not updated correctly when you change project in the Matrix view
2.6 (February 2024)
Application enhancements
Weekday on the Time Tracking Entries page
We’ve upgraded the time tracking page with the addition of weekdays alongside dates, offering users a clearer view of their schedules. Stay organized with the new weekday on the page, simplifying your planning and time management.
Fixes and minor adjustments
- #311 No error if time entry cannot be created from time tracking entries
- #313 TryFunction modifications to exclude write transactions
- #314 Deleting the last Detailed Time Tracking Entry should delete the Time Tracking Entry too
- #315 Projects are not always selected automatically
- #316 Tasks are not always selected automatically
- #319 Permissions for time tracking are required when Time Tracking Enabled is false
2.5 (January 2024)
Application enhancements
Customize appointment resizing intervals in your calendar
Tailor your appointment manipulation experience by setting the desired time increment. Ideal for professions like accounting and legal that often track time in precise intervals, this feature ensures the calendar remains manageable without sacrificing the view size. Experience enhanced control and efficiency in your scheduling with this latest update.
Time Tracking Calendar shortcut and new Timesheet Period view
Access the Time Tracking Calendar directly from Timesheet and Time Tracking Entries. The Calendar has new Timesheet period view. Accessing the page adapts dynamically to your current date filter or selected period type in the Time Tracking Entries or Timesheet. Say goodbye to unnecessary searches.
Totals factbox for time tracking views
The factbox on both the Time Tracking Entries and Time Tracking Calendar pages, designed to provide an overview of your tracked time for a specific period. This feature includes key metrics such as Total Tracked, Total Tracked (Rounded), Tracked time on Time Entry, Tracked time not on Time Entry, and Norm time. Stay informed and easily align your tracked time with expected working hours.
Fixes and minor adjustments
- #269 Outlook meeting that ends at midnight it gets imported on the wrong day
- #278 Error when there is nothing to update from time tracking calendar
- #279 Short trackings in calendar become very hard to select
2.4 (December 2023)
Fixes and minor adjustments
- #270 When multiple Norm Working Hours exists, Outlook appointments can’t be imported
- #273 Extended Description is not fully loaded on Import from Outlook
- #282 Dimensions are not updated with default task on project
- #290 Update Time Entry/Time Entry Line after re-installation of Pryme Time
2.3.1 (November 2023)
Fixes and minor adjustments
- #271 Detailed TTE Entry No. error after importing appointments from Outlook
2.3 (November 2023)
Application enhancements
Graphical representation of time tracking
The latest update brings a graphical representation of your detailed time tracking in a vibrant and intuitive calendar format. Enjoy a more dynamic and user-friendly experience with drag-and-drop functionality for easy task rearrangement, creation, and deletion. The new calendar integrates with our timesheet feature, allowing you to create and update entries directly. The addition of colorful view enhances productivity, making it easy to distinguish between detailed time tracking entries which belong to the different time tracking items, to a more visually appealing and organized workflow.
Allowed and Default Work Type on Task Templates
By pre-defining the Default Work Type at the Task Template level, users can now have specific Default Work Types for newly created tasks, distinct from those defined at the project level. When creating tasks from the Task Template, values specified in the Template Lines for each task will take precedence over the Default Work Type defined at the Project or Project Template level.
Fixes and minor adjustments
- #193 Show description in footer causes program to crash when in matrix mode
- #245 Dimensions are not updated on the time entry when changing the project with single task
2.2 (October 2023)
Fixes and minor adjustments
- #190 Error handling on Import of Work Assignments to the timesheet
- #205 Work type code does not work correctly in Matrix view
2.1.1 (September 2023)
Fixes and minor adjustments
- #192 Dimension page for Resource Agreement Groups has wrong table id filter
2.1 (August 2023)
Fixes and minor adjustments
- #166 Filter Recent Projects and Recent Tasks by selected Customer
- #170 Banner translation in the Email Timesheet Reminder
- #178 Agreement Group data is missing in Job Ledger Entry
- #180 Rows with weekday 0 on time reporting via mobile app
2.0.1 (July 2023)
Fixes and minor adjustments
- #167 Project lookup doesn’t filter on selected Customer
2.0 (June 2023)
Application enhancements
Create Time Tracking Entries from Outlook calendar appointments
The feature allows you to convert Outlook calendar appointments into Time Tracking Entries. The function searches for appointments that meet the specified filters on the request page, including current resource and the date filters. Upon running the action again, it will synchronize previously imported appointments that meet the specified filters. The synchronization will update the Date, Start and End Time, while preserving the original description.
Default Task for Time Entries
In some lines of business, the majority of time entries are typically associated with a single task per project. By defining this task on the project, the users can skip selecting the task for most time entries, thus saving time. In addition to their general functionality, the new release offers Default Time Entries Task functionality. Once a Default Task is configured for a project, it automatically populates the task field whenever the project is selected in the timesheet or Time Tracking Entries, enhancing efficiency and eliminating the need for manual task selection.
Default Work Type on Project Card and Project Templates
When a Default Work Type is needed on tasks, it must be defined on each task. By pre-defining the Default Work Type on project level, the users can skip selecting it on every new task, thus saving time. On defining default work type for the project, the user will be asked to copy the same Default Work Type to all tasks in the project. Also, every newly created task from the project will have the same Deafult Work Type. Projects that are being created from the template, will have Default Work Type copied from the template.
Multiple selection for Create/ Update Time Entry
It is possible to include and exclude all lines in the Time Tracking Entries for Create/ Update Time Entries action. Include All and Exclude All will mark or clear out field Create/ Update Entry for all lines in the view from once.
Resource Analysis
The Resource Time Analysis, Resource Amount Analysis, Resource Expected Achievement and Resource Agreement Group functionality is moved from the Pryme Matters app to the Pryme Time app. This does not cause any change to users.
Fixes and minor adjustments
- #1191 Weekday is missing for flex when the timesheet is being submitted
- #1246 Import of work assignments doesn’t work for the last day of the time period
1.7 (May 2023)
Application enhancements
Time Period Selection and Navigation in the Time Tracking Entries
Improves navigation and efficiency when working with specific time periods or days. Period Type and Date filter are new options on the Time Tracking Entries page, allowing users to select a specific period for filtering entries. Additionally, new Previous and Next options at the top of the page enable easy navigation between chosen Period Type.
For greater flexibility in recording your time, manual tracking is available now. Allows users to enter Start and End Time directly in the fields, and with that controling starting and stopping time. Users are no longer obligated to rely solely on the start and stop buttons for time tracking. You can initiate time tracking by filling out the Start Time field on the today’s date, which will automatically trigger the tracking process. Similarly, when entering the Ending Time, the Start/Stop button will be automatically set to indicate that tracking has stopped.
List of errors on running Create/Update Time Entries
Create/Update Time Tracking functionality enhances error handling and provides users with more transparency. Starting from this release, when running the Create/Update Time Tracking process, any encountered errors will be displayed to the user as a list. This will assist users in quickly identifying and resolving issues related to time tracking entries that can’t be transferred to the timesheet. Correct entries will proceed with the process despite the occurrence of failures for certain entries. The error list will include following details of entries: date, start time, end time and error text.
Fixes and minor adjustments
- #1140 Update of Work Types in the timesheet after Allowed Work Type changed
- #1172 On modyfing matrix, the connected Time Tracking Entry is not updated
- #1173 Error on filtering timesheet by Weekday
- #1187 Create/Update procedure should be filtered when run from time tracking entries
- #1193 Filter on the weekday reset all filters for the timesheet
- #1200 Extended decription is cut on transfer from Time Tracking Entries
- #1216 Customer and project lookup fix in the matrix view
- #1190 Time trackings shouldn’t be combined into one time entry during transferring to the timesheet
- #1215 Renaming Create Time Entry field
1.6.5 (April 2023)
Fixes and minor adjustments
- Detailed Time Tracking Entries have shared data across companies in the environment
1.6.4 (April 2023)
Fixes and minor adjustments
- #1200 Extended description is cut on transfer from Time Tracking Entries
1.6.2 (April 2023)
Fixes and minor adjustments
- Invoice creation perormance issues
1.6.1 (April 2023)
Fixes and minor adjustments
- #1196 Integration events on Timesheet modification
1.6 (April 2023)
Fixes and minor adjustments
- #1155 Transfer to the closed time periods shouln’t be allowed
- #1160 On selecting project task, description has been reseted in Outlook time entry
- #1161 After deletion Time Entry reference removed from Time Tracking Entry
- Time Entry Created unchecked on the Time Tracking Entry
- #1165 Ending Time can’t be empty in Detailed Time Tracking Entry
- Ending Time is never empty, except for the last Detailed Time Tracking Entry
- When press start on the Start/ Stop, Start Time field in the Detailed TTE is validated
- #1167 Description update from Time Tracking Entry to the Detailed Time Tracking Entries
- #1168 Description update from the Timesheet to the Time Tracking
- #1169 Create/ Update action has the same name on pages
- When tracking page is opened from the search bar, the action Create/ Update Time Entries is hidden. In the timesheet it’s promoted.
- #1184 Integration events added on inserting/updating timesheet with time tracking entries.
1.5.2 (April 2023)
Fixes and minor adjustments
- #1171 Transfer of work assignments with hours to the timesheet
1.5.1 (March 2023)
Fixes and minor adjustments
- #1130 Resolved missing weekday when enter time from Outlook
- #1133 Default Work Type list limited to the Allowed Work Types
- #1135 User can report time on dates that isn’t within the time period of the timesheet
- #1141 The Tracked column should be updated after stopping time in the Time Tracking Entries
- #1142 The detailed time tracking column adjustment
- #1143 Start/stop button in time tracking to be disabled on date different than today
- #1145 Description missing in time tracking entries
- #1146 Create/Update Time Entries create time entries from multiple weeks in one time sheet
- #1154 On Ending Time delete in the Time Tracking Entries the button should be updated
1.5 (March 2023)
Application enhancements
Allowed Work Types
You can now define what work types are allowed for a given task. Different sets of work types can be defined in the Work Type Sets page. Each project task can then be set to only allow a specific set of work type on the Task Card. It is possible to define the allowed set of work types on the Project Card, this will then be the default for all new tasks, and you can optionally update the existing task. From the Work Type Sets page, existing projects can be updated with a selected Work Type Set.
Default Work Type
The Default Work Type fields and functionality is moved from the Pryme Matters app to the Pryme Time app. This does not cause any change to users.
Work Type as drop-down list
To increase productivity, the field Work Type has been changed from opening a new page when looking up work types to showing a drop-down list immediately.
Extended description in Time Tracking Entries
In the previous release, we integrated extended description functionality across several areas of the app, including project management, timesheet submission/approval, and invoicing views. In the new release, we have made further enhancements by adding it specifically to time tracking entries. This means that users can now activate and use extended description within the Time Tracking section, just as they can in other areas of the app.
Fixes and minor adjustments
- #1089 Reminder email shows garbled special characters
- #1102 Selecting project task removes prior description
- #1105 Customer lookup in Time Tracking works the same way as in timesheet
- #1107 Description text-field in mobile time reporting is missing
- #1111 Customer and Project missing after rejection of time
1.4 (February 2023)
Application enhancements
Extended description integration
Extended description is now integrated across the project management, timesheet submission/approval, and invoicing views.
Providing a comprehensive and detailed explanation for transactions when necessary, leads to improved accuracy, increased transparency and better record-keeping.
You can activate and define the desired options for using extended description in Project Setup.
Fixes and minor adjustments
- #1088 Email reminders are sent to resource that should not receive reminders
1.3 (January 2023)
Fixes and minor adjustments
- #1083 Starting and stopping on a time entry line does not update quantity
- #1084 Time Tracking Entries opened from Timesheet are not filtered by date
- #1085 Customer Name is not filled when selecting Project
1.2 (January 2023)
Fixes and minor adjustments
- #1081 Rounding method is not created on install
- #1082 Project no. lookup on Time Tracking Entries fails.
Project is not automatically selected when it should be.
Task is not automatically selected when it should be.
Creating a new gives an error under certain conditions
1.1 (January 2023)
Fixes and minor adjustments
- #1077 Project no. lookup on time entry fails
Customer and Project fails to fill out on the matrix lines due to reopening timesheet
Manually modifying the Start/End Time on the TT and Detailed TT does not always update quantity on the related time entry
Start time on time details can be deleted
Language code in the timesheet is not updated when validate project no.
Email reminder cannot be sent to all resources
Blank weekday can be selected on time entries
1.0.0.0 (December 2022)
Initial release
6 -